Today's post is about one of the 3D Printing adaptation that I learned. This is specifically about how to control an LED light automatically through OctoLapse so that it is switched on only when the timelapse photo is taken.

Just as a background, I have been learning to use 3D printer and its customizations options for a few months now and was a lot of learning since then. The best thing was OctoPi, a platform for controlling the 3D printer and the many plugin options that are developed by the community. Most of them are like open source. Today we will discuss specifically about an adaptation to one such plugin, OctoLapse.
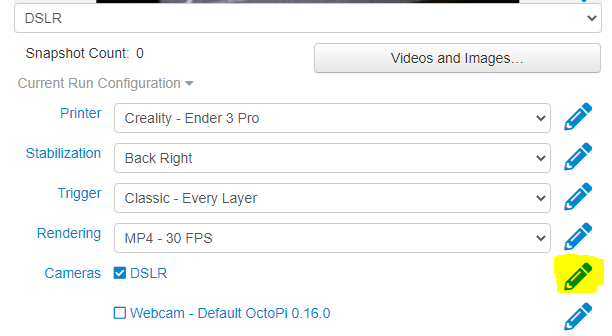
OctoLapse is the plugin for taking timelapse photos, with many options for further customisations. One of the best timelapse method is taking photo after each layer is complete, by moving the head out of the way. You can use standard Pi Camera or a DSLR, which is great to get good resolution videos.
One small flash back before we dive into the topic. I keep the printer at the corner of the shelf. most of the printing happens at the night. If I needed to check on it, it was not easy. I found the way around by keeping a LED strip at that location and it was connected using a relay controlled through GPIO pin of Pi. There is an ENCLOSURE plug-in that allows the GPIO pin to be controlled through the OctoPrint Web Interface. This allowed me to switch the light on and off through the web. When I need to check on the print, I can see the status using the webcam by switching the light on. Once I am done, I can turn it off as well.
Coming back to the topic now. I setup the DSLR to take the time lapse. But the next challenge was that I needed light while taking photo. I could keep the LED always-on to do that, but that was not the best way. I felt there must be a way to switch on and off the LED before and after the photo is taken, through the OctoLapse. But it was not as straight forward as I thought it would be!
Some guidance from FormerLuker confirmed that it has to be through a python script and thanks to him helping be with right leads. More googling and applying some gut instincts (as my python knowledge was close to zero if not zero). But then how to create the script. Then realised that it is a file to be created inside Pi and did it through SSH through putty, again salvaged codes from web. Created two files, one for switching on and another for switching off. I will keep the codes at the end of the post.


#!/usr/bin/env python#!/bin/shimport RPi.GPIO as GPIOimport timeGPIO.setwarnings(False)GPIO.setmode(GPIO.BCM)GPIO.setup(18, GPIO.OUT)GPIO.output(18, True)time.sleep(2)
Contents of led-pff.py
#!/usr/bin/env python#!/bin/shimport RPi.GPIO as GPIOimport timeGPIO.setwarnings(False)GPIO.setmode(GPIO.BCM)GPIO.setup(18, GPIO.OUT)GPIO.output(18, False)time.sleep(2)
Hope this helps you further the explorations 😀
Comments